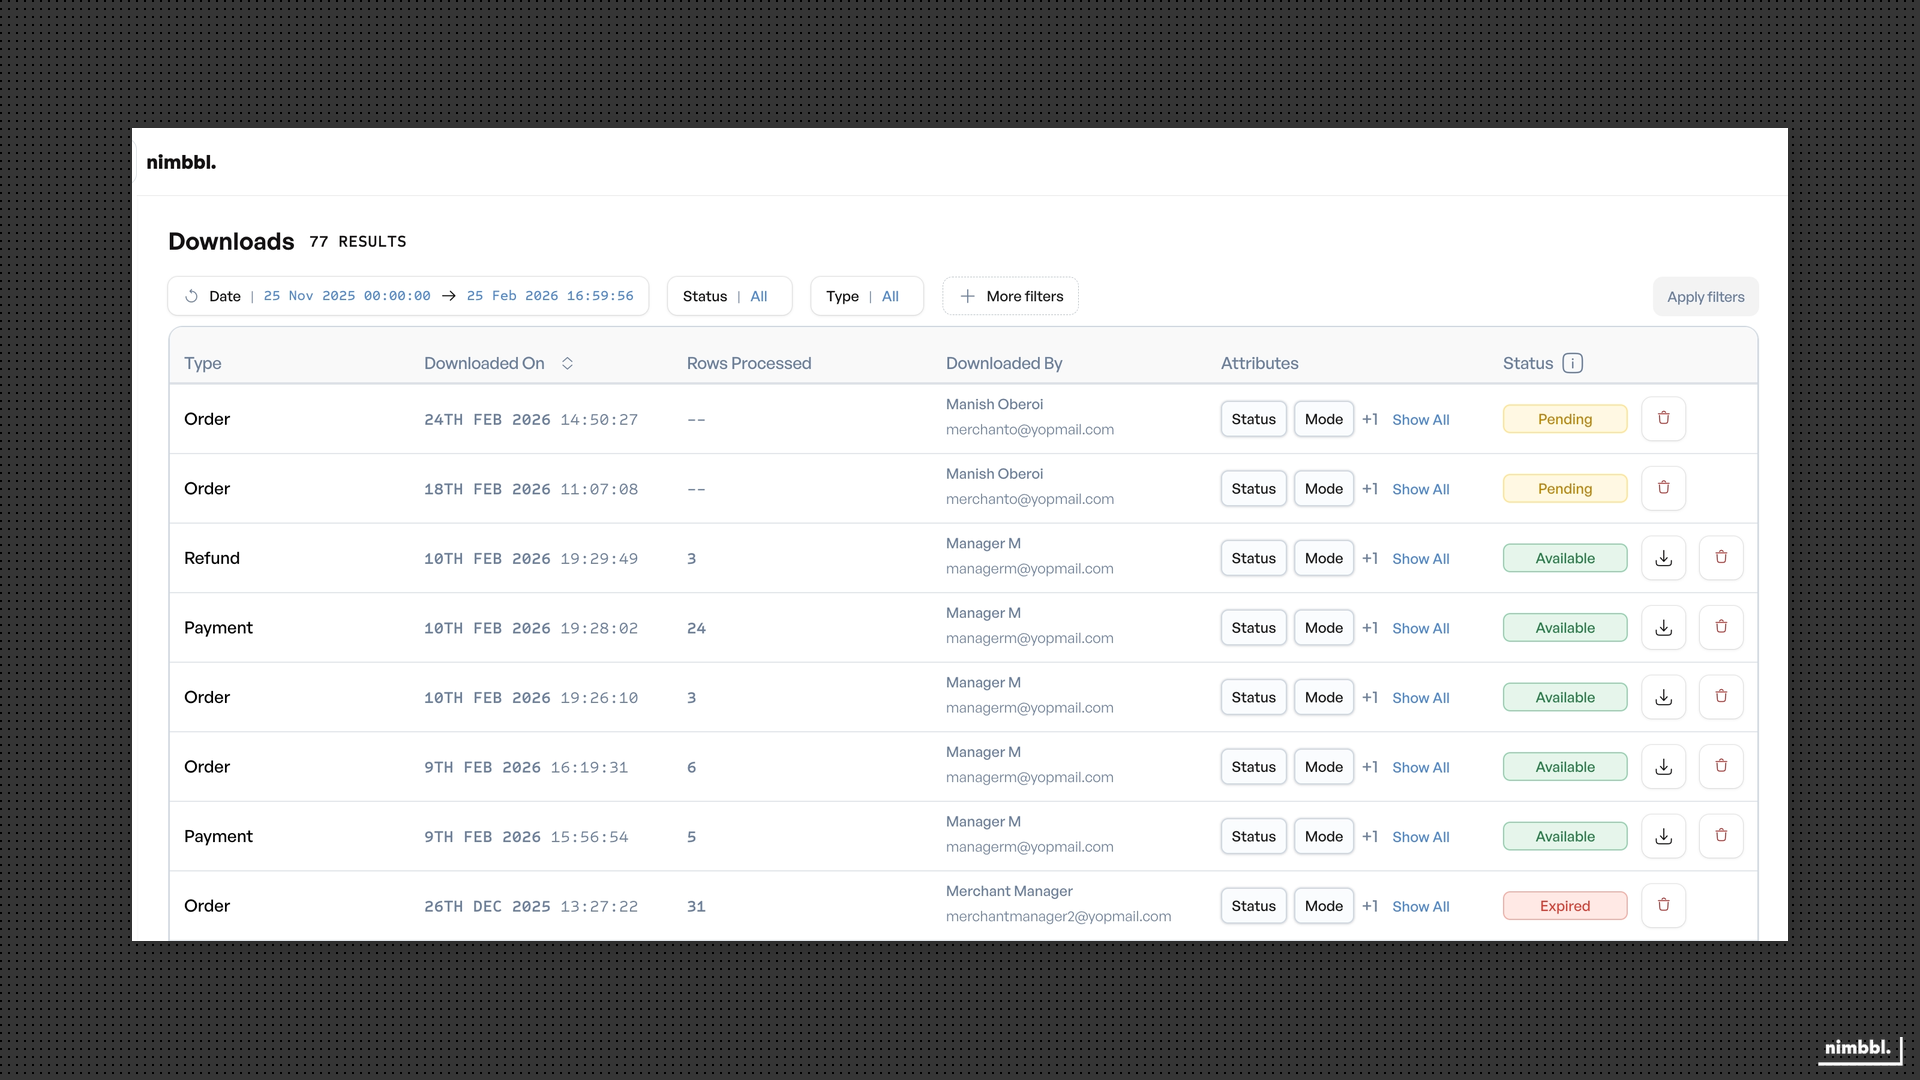
Downloads
Downloads lets you export transaction data -- orders, payments, and refunds -- as CSV or Excel files. Use Files > Downloads to submit export requests, track their progress, and download files when they are ready. You can also start a download from any Search page (Orders, Payments, or Refunds) using the download action; the file then appears here.
Common use cases for downloads include:
- Reporting -- Export payment data for a specific date range to prepare internal reports or share with stakeholders.
- Reconciliation -- Download order and payment records to reconcile transactions against your accounting system.
- Analysis -- Pull refund data to analyze trends such as frequently refunded products or high-refund periods.
- Record keeping -- Export historical data periodically for audit trails and compliance.
- Dispute resolution -- Export transaction records to support chargeback disputes or customer service inquiries.
Requesting a Download
There are two ways to request a download:
- From the Files menu -- Navigate to Files > Downloads and create a request directly (described in this section).
- From a Search page -- Use the download action on the Orders, Payments, or Refunds page. For details on that workflow, see Downloading Data in the Search documentation.
Both methods produce a file that appears in Files > Downloads when it is ready.
Accessing Downloads
Go to Files > Downloads in the Command Center sidebar to see your existing download requests and create new ones.
You need appropriate access permissions to view and request downloads. If you do not see the Downloads menu, contact your organization administrator.
Selecting the Data Type
The first step is to choose the type of data you want to export. Each data type produces a file with columns specific to that entity:
- Payments -- Exports payment transaction records including payment ID, amount, status, payment mode, and timestamps.
- Orders -- Exports order records including order ID, invoice ID, total amount, status, and associated payment details.
- Refunds -- Exports refund records including refund ID, original transaction reference, refund amount, status, and reason.
You can only export one data type per download request. If you need data for multiple types, create separate requests for each.
Filtering Your Data
After selecting the data type, apply filters to narrow down the exact records that appear in your export file. The available filters include:
- Date range -- Select a start and end date for the records you want to export.
- Status -- Filter by transaction status (for example, Success, Failed, or Pending).
- Environment -- Choose between live and test transactions.
- Currency -- Select one or more currencies.
- Amount -- Specify an amount or amount range.
- Customer identifiers -- Filter by email address or mobile number.
- Invoice ID -- Search for records tied to a specific invoice.
- Custom attributes -- Filter by any custom key-value pairs attached to your transactions.
The more specific your filters, the more focused your export file will be. For large data sets, consider narrowing the date range or adding status filters to reduce the number of rows. If you are unsure which filters to apply, start with a date range and then refine from there.
Choosing a File Format
Before submitting your request, choose the file format for your export:
- CSV (.csv) -- A plain-text format that opens in any spreadsheet application. Best for large data sets or when you plan to import the data into another system.
- Excel (.xlsx) -- A formatted spreadsheet file. Best when you plan to view or analyze the data directly in a spreadsheet application.
Submitting the Request
Once you have configured your filters and chosen a format, submit the request. Here is the full workflow:
- Navigate to Files > Downloads.
- Select the data type you want to export (payments, orders, or refunds).
- Apply filters to narrow down the records.
- Choose the file format -- CSV or Excel.
- Submit the request.
Your request is processed in the background. After you submit, it appears in the Downloads list with a Pending status. Processing time depends on the amount of data -- a small export may be ready in seconds, while a large one may take several minutes.
There is a maximum of 500,000 rows per download request. If your filtered data exceeds this limit, create multiple requests with different date ranges to cover the full data set.
Downloading from Search Pages
In addition to requesting downloads from the Files menu, you can initiate a download directly from any Search page -- Orders, Payments, or Refunds. This is convenient when you have already applied filters on a Search page and want to export those exact results.
- Navigate to the Search page for the data type you want (Orders, Payments, or Refunds).
- Apply your desired filters on the Search page.
- Select the Download button.
- Confirm the filters and submit.
- A success message appears with a Go to downloads link.
- The file is generated in the background and appears under Files > Downloads when ready.
The same row limit of 500,000 applies to downloads initiated from Search pages. The resulting file follows the same lifecycle and expiration rules described in this guide.
Tracking Status and Retrieving Files
The Downloads list shows all your export requests and their current status. Statuses update automatically as files are processed -- you do not need to refresh the page.
Download Statuses
Each download moves through a lifecycle from Pending to a final state. The table below describes each status and whether the file can be downloaded.
| Status | Description | Can Download |
|---|---|---|
| Pending | File generation is in progress | No |
| Available | File is ready for download | Yes |
| Failed | File generation failed | No |
| Expired | File has passed its 30-day retention period | No |
| Deleted | Record has been archived or removed | No |
Status indicators are color-coded so you can see the current state of each request at a glance.
Notifications
You may receive an email or in-app notification when a file becomes available. If you initiated the download from a Search page, the success message includes a Go to downloads link that takes you directly to the Downloads list.
Downloading Your File
When a file reaches Available status, you can download it to your computer:
- Locate your download request in the Downloads list.
- Confirm the status shows Available.
- Click the download icon on that row.
- The file downloads immediately to your browser's default download location.
If the download does not start, check your browser's download settings or pop-up blocker, and try clicking the download icon again. The file is saved with the format you selected when you created the request (CSV or Excel).
The download icon is only visible when the file status is Available and you have permission to download files. If you do not see the icon, contact your organization administrator to check your access permissions.
Files expire 30 days after the export date. Once expired, they can no longer be downloaded. If you need the data again, create a new download request with the same filters.
Managing Download History
The Downloads list acts as your history of all export requests -- both current and past. You can browse, filter, and manage these records over time.
List Columns
The Downloads list displays the following information for each request:
- Type -- The data type that was exported (payments, orders, or refunds).
- Start Date -- The date the download request was submitted.
- Rows Processed -- The total number of rows included in the export file.
- Downloaded By -- The user who requested the download.
- Attributes -- A summary of the filters that were applied to the request.
- Status -- The current processing status (Pending, Available, Failed, Expired, or Deleted).
Filtering and Pagination
You can filter the Downloads list to find specific requests:
- Date -- Narrow by the date range when requests were submitted.
- Status -- Show only requests in a particular state (for example, Available or Failed).
- Type -- Filter by data type (payments, orders, or refunds).
- User -- Show only requests made by a specific user.
Use the pagination controls at the bottom of the list to page through your download history.
Archiving Downloads
You can archive download records to clean up your Downloads list. Archiving removes the record from your active view and the file can no longer be downloaded.
You need appropriate permissions to archive downloads. If you do not see the archive option, contact your organization administrator.
The archive option is available for all downloads except those that have already been deleted. Once archived, the record status changes to Deleted.
Handling Failed Downloads
If a download fails during file generation, its status shows as Failed. A failed download cannot be retried from the same record. Instead, create a new download request with the same filters to generate the file again. Failures are uncommon but can occur if the data set is unusually large or if a temporary processing issue is encountered. If downloads fail repeatedly, contact Nimbbl support for assistance.
File Expiration
All download files have a 30-day retention period measured from the export date. After 30 days:
- The status automatically changes to Expired.
- The file is removed and can no longer be downloaded.
- The record remains in your download history for reference, but the file itself is no longer accessible.
If you need data from an expired file, submit a new download request with the same filters. Consider downloading files promptly or setting a reminder so you do not miss the expiration window for important exports.
Tips for Effective Downloads
Keep these best practices in mind when working with downloads:
- Plan your date ranges -- For very large data sets, break your export into smaller date ranges (for example, one month at a time) to stay within the 500,000-row limit and reduce processing time.
- Use specific filters -- Adding filters such as status, currency, or environment helps you get exactly the data you need without unnecessary rows.
- Download promptly -- Files expire after 30 days. If you need a file for ongoing reference, download it as soon as it becomes available and save it to your local system or shared drive.
- Check the environment -- Make sure you have selected the correct environment (live or test) before submitting a request. Test data exports are useful during integration but should not be mixed with live transaction data in your reports.
- Review the row count -- After a download completes, check the Rows Processed column to verify the export contains the expected number of records. If the count seems too low or too high, review your filters and create a new request if needed.