Uploads
Uploads lets you perform bulk operations by uploading CSV or Excel files. Use Files > Uploads to process bulk refunds and other bulk operations as they become available. Instead of processing each operation individually, you can prepare a file with multiple records and upload it for batch processing.
This page covers the full upload workflow: preparing your file, uploading it, tracking processing status, reviewing results, and handling any errors that occur.
Currently, the following upload types are available:
- Refund -- Process multiple refunds at once by uploading a file with transaction references and refund amounts.
Additional upload types such as bulk payment links may be added in the future.
Common use cases for uploads include:
- End-of-day refund batches -- Process a batch of refunds at the end of each business day instead of handling them one by one throughout the day.
- Bulk refunds for cancelled events or promotions -- When an event is cancelled or a promotion needs to be reversed, upload a single file to refund all affected transactions at once.
- Periodic reconciliation refunds -- After reconciling your records, upload any outstanding refunds identified during the reconciliation process.
Upload files must be 10 MB or smaller and expire 30 days after the upload date. After expiration, the uploaded file and any result files can no longer be downloaded.
Uploading a File
Accessing Uploads
Go to Files > Uploads in the Command Center sidebar to see your existing uploads and their statuses. To start a new upload, select the Upload button in the filter section.
You need appropriate access permissions to upload files. If you do not see the Upload button, contact your organization administrator.
Upload Workflow
The upload workflow has four steps:
- Select upload type -- In the upload dialog, choose the type of bulk operation you want to perform. Currently, the available option is Refund. The upload type determines which column requirements apply to your file.
- Choose your file -- Drag and drop a file into the upload area, or click to browse and select a file from your computer. The file must be CSV (.csv) or Excel (.xlsx) and no larger than 10 MB.
- Validation -- Your file is checked for type, size, and format before processing begins. If the file does not meet the requirements, you will see an error message explaining what needs to be corrected.
- Submit -- After validation passes, the file is uploaded and processing starts in the background.

File Format Requirements
All upload files must meet these requirements:
- Format -- CSV (.csv) or Excel (.xlsx). No other file formats are accepted.
- Size -- 10 MB maximum. If your file exceeds this limit, split it into smaller files.
- Headers -- Column headers must be in the first row. Headers are case-sensitive and must match the required column names exactly.
- Data -- The file must contain at least one data row below the headers. Files that are empty or contain only headers will be rejected.
- Encoding -- For CSV files, use standard UTF-8 encoding to avoid character issues. Most spreadsheet applications save in this encoding by default.
Column names are case-sensitive. Make sure your headers match the required names exactly (for example, transaction_id, not Transaction_ID).
Bulk Refund File Format
For bulk refunds, select Refund as the upload type. Your file must include the columns described in the table below.
| Column | Required | Description | Format |
|---|---|---|---|
transaction_id | Conditional | Payment transaction ID | String; required if invoice_id is not provided |
invoice_id | Conditional | Order invoice ID | String; required if transaction_id is not provided |
refund_amount | Yes | Refund amount | Decimal (for example, 1000.00) |
refund_request_id | No | Unique identifier for the refund | String; must be unique if provided |
Important rules for bulk refund files:
- You must include either
transaction_idorinvoice_idin each row (at least one is required). You can include both, but at least one must be present. - The
refund_amountmust be a number with decimals (for example,1000.00). Whole numbers without decimals (for example,1000) may cause validation errors. - If you include the
refund_request_idcolumn, every value in that column must be unique. Duplicate request IDs will cause those rows to fail. - The maximum is 2,000 rows per file. If you need to process more refunds, split them across multiple files and upload each one separately.
- Headers must appear in the first row and match the column names shown above exactly.
After processing, all refunds -- successful and failed -- appear in Search > Refunds. For a detailed overview of how refunds work, see the Refunds Guide.
Preparing Your File
Before uploading, take a few minutes to verify that your file is ready. A well-prepared file reduces the chance of validation errors and failed records.
- Open your file in a spreadsheet application or text editor.
- Confirm the first row contains the required column headers (
transaction_idorinvoice_id,refund_amount, and optionallyrefund_request_id). - Check that each data row has valid values -- a transaction or invoice ID that exists in your account and a refund amount in decimal format.
- Verify that refund amounts do not exceed the refundable amount for each transaction. You can check refundable amounts in Search > Payments by viewing the payment detail for each transaction.
- If using
refund_request_id, make sure there are no duplicate values across all rows. - Confirm the file has no more than 2,000 data rows. If it does, split it into smaller files.
- Save the file as CSV (.csv) or Excel (.xlsx) and verify it is 10 MB or smaller.
Bulk Payment Link Uploads
Bulk payment link uploads are not currently available but may be added in the future. When this feature becomes available, it will appear as an additional option in the upload type selector. For information about creating individual payment links, see Payment Links.
Tracking Upload Status
After you submit a file, it appears in the Uploads list with a status that updates automatically as processing progresses. You do not need to refresh the page -- the status changes on its own.
| Status | Description | Success File | Error File |
|---|---|---|---|
| Pending | File received, waiting to be processed | No | No |
| Succeeded | All records processed successfully | Yes | No |
| Failed | All records failed to process | No | Yes |
| Partially Done | Some records succeeded, some failed | Yes | Yes |
Processing time varies depending on how many records are in your file. A file with a few dozen records may complete within seconds, while one with thousands of rows may take several minutes. Status indicators are color-coded so you can see the current state at a glance.
While your file is being processed, you can continue using other parts of Command Center. You do not need to stay on the Uploads page -- come back at any time to check progress.
Reviewing Results and Handling Errors
Upload List View
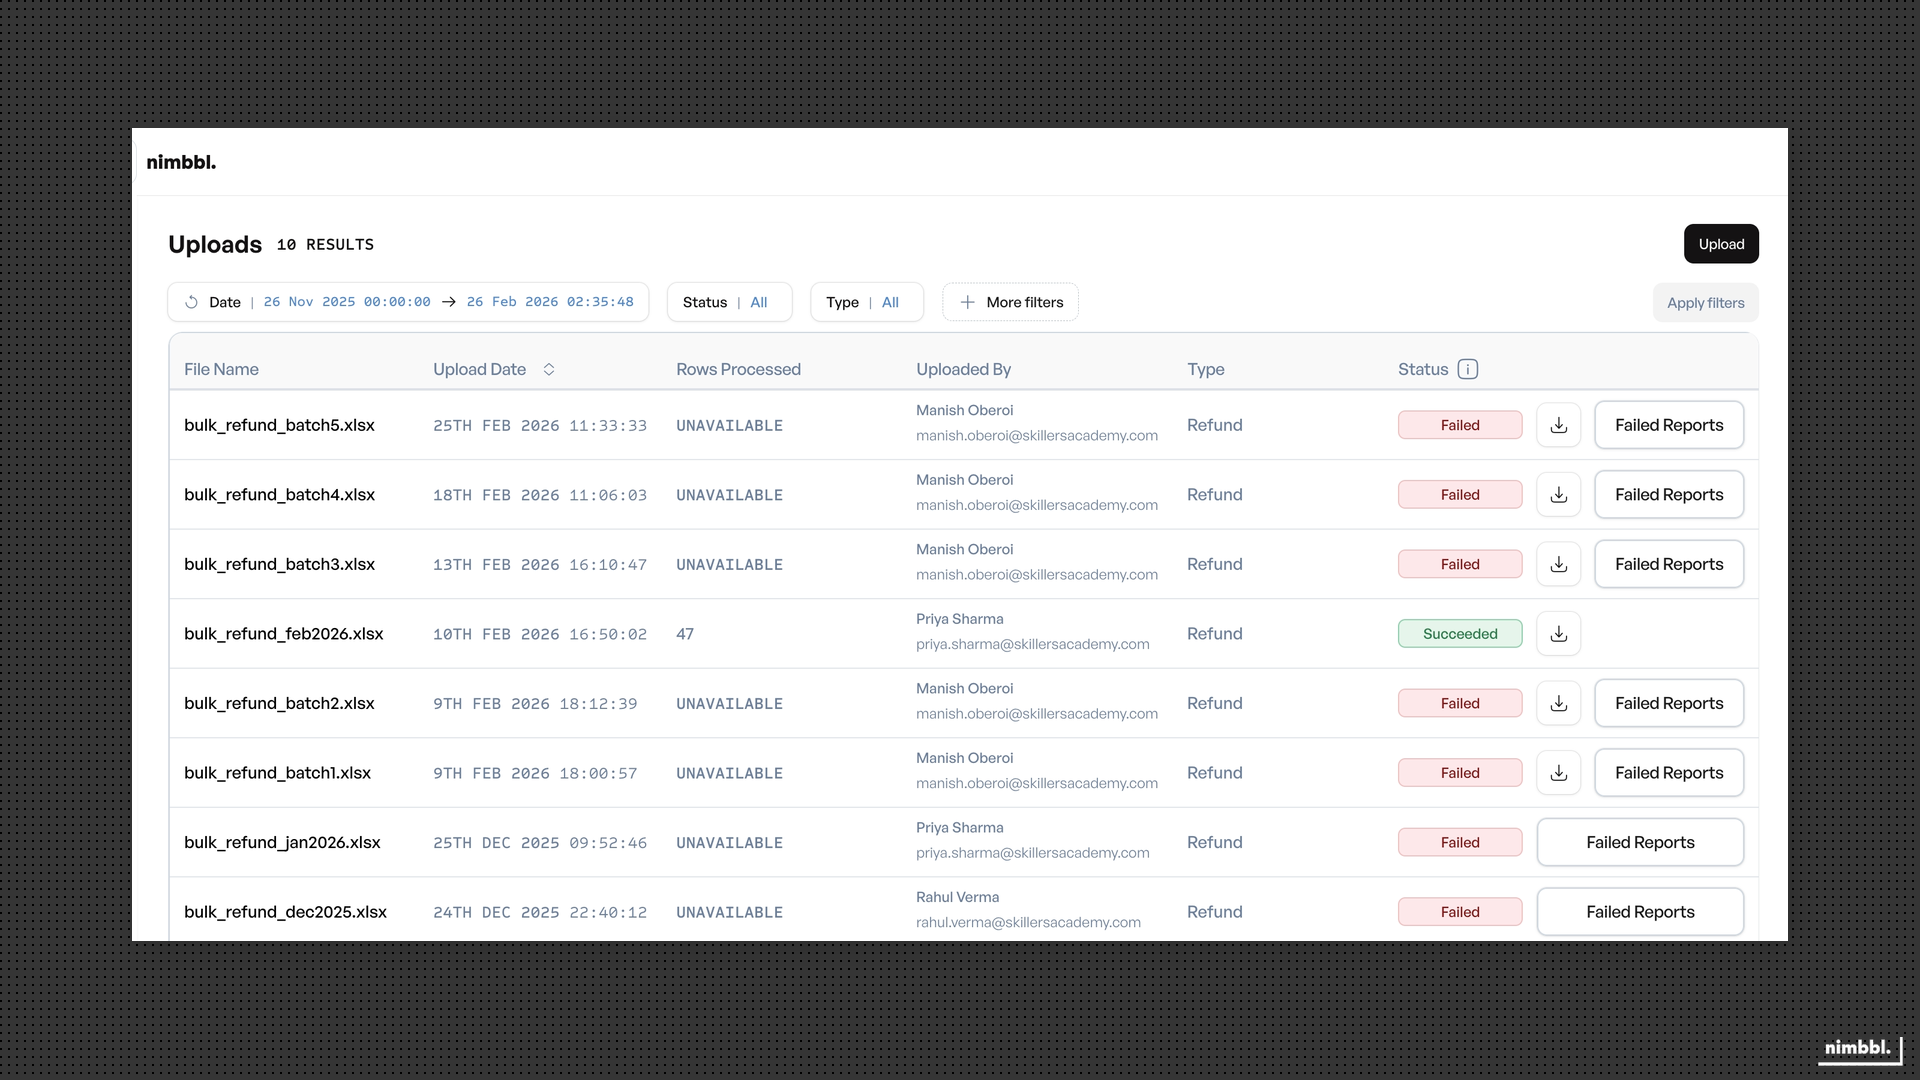
The Uploads list displays the following columns for each upload:
- File Name -- The name of the file you uploaded.
- Upload Date -- The date and time the file was submitted.
- Rows Processed -- The total number of rows that were processed from your file.
- Uploaded By -- The user who submitted the upload.
- Type -- The upload type (for example, Refund).
- Status -- The current processing status (Pending, Succeeded, Failed, or Partially Done).
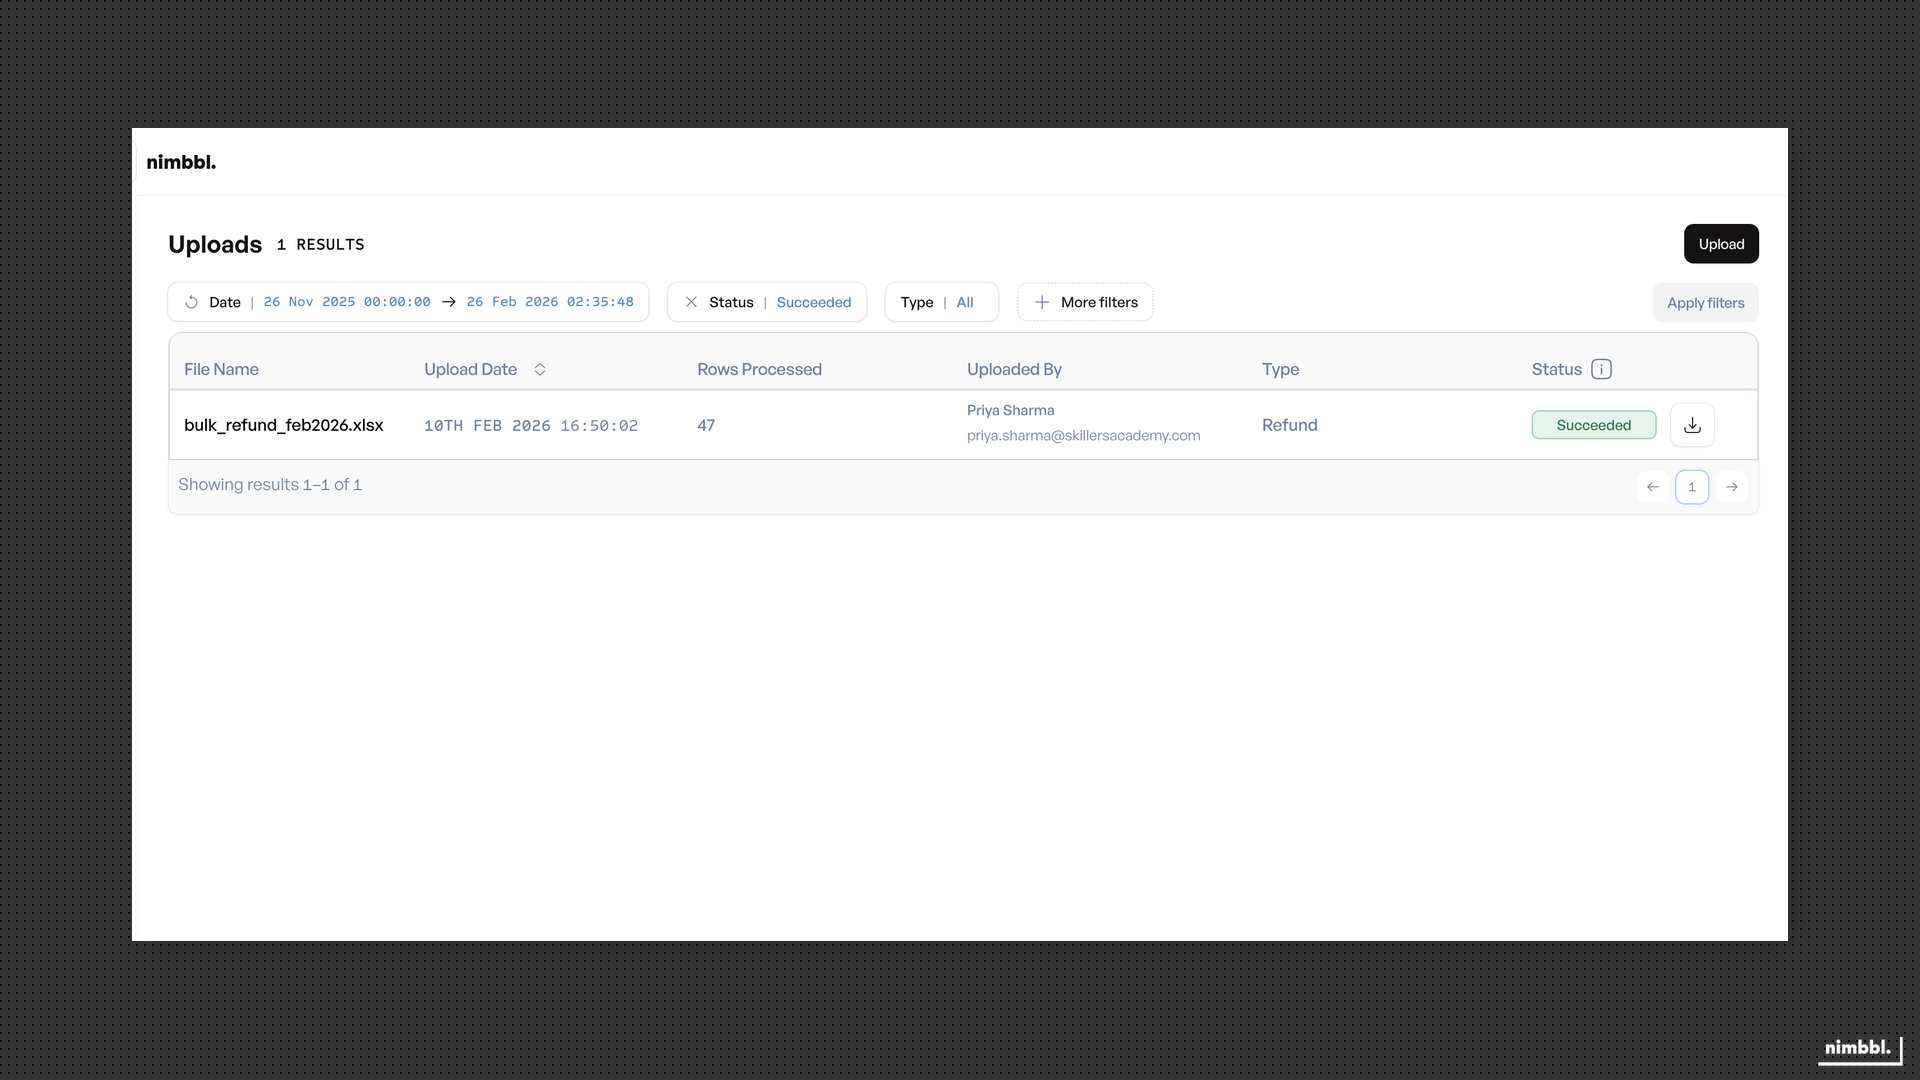
You can filter the Uploads list by date, status, type, user name, or file name to find specific uploads. Use the pagination controls at the bottom of the list to browse through your upload history. This is particularly useful when your team processes bulk uploads regularly and you need to locate a specific file or check the outcome of a past upload.
Success and Error Files
When processing completes, result files become available depending on the outcome:
- Success file -- Available when the status is Succeeded or Partially Done. Download it by clicking the download icon on that row. The success file contains all records that were processed successfully.
- Error file -- Available when the status is Failed or Partially Done. Click the Failed Reports button to download it. The error file contains each record that failed along with the specific reason for the failure. Error file columns include the invoice ID or transaction ID, refund amount, refund request ID, and the failure reason.
Understanding Each Status
- Succeeded -- Every record in your file was processed without issues. A success file is available for download. No error file is generated.
- Failed -- Every record in your file failed to process. An error file is available so you can review the failure reasons. No success file is generated.
- Partially Done -- Some records succeeded and some failed. Both a success file and an error file are available. Download the error file to see which records need attention.
Common Error Reasons
When records fail, the error file shows a specific failure reason for each one. Common reasons include:
- The transaction ID or invoice ID does not exist or is invalid.
- The refund amount is not in the correct decimal format.
- A duplicate
refund_request_idwas found in the file. - The refund amount exceeds the amount that can be refunded for that transaction (for example, the original payment amount minus any previous refunds).
- Required columns (
transaction_idorinvoice_id, andrefund_amount) are missing from the row.
Fixing and Re-uploading
Failed uploads cannot be retried from the same record. Download the error file, correct the issues in your original file, and upload the corrected version as a new upload.
To fix errors and re-upload:
- Download the error file to identify which records failed and why.
- Open your original upload file.
- Correct the issues for each failed record based on the failure reasons in the error file.
- Remove any records that were already processed successfully (they appear in the success file and do not need to be uploaded again).
- Save the corrected file.
- Upload the corrected file as a new upload. This creates a new upload record in the list.
Each re-upload is treated as a separate upload with its own status and result files. The original upload record remains in the list for your reference.
File Expiration
Upload files expire 30 days after the upload date. After expiration:
- The uploaded file can no longer be downloaded.
- Success and error files are also no longer accessible.
- The upload record remains in your list for reference, but the files themselves are removed.
If you need to reference results from an expired upload, you will need to re-upload the file and process it again. Consider downloading result files promptly after processing completes, especially if you may need them for reconciliation or audit purposes later.
Tips for Successful Uploads
Keep these best practices in mind to avoid common issues:
- Start with a small test file -- If you are uploading for the first time, prepare a file with a few test records first. This helps you confirm the file format and column names are correct before processing a large batch.
- Validate IDs before uploading -- Use Search > Payments or Search > Orders to verify that the transaction IDs or invoice IDs in your file are valid and belong to completed transactions.
- Use the correct decimal format -- Enter refund amounts with two decimal places (for example,
500.00rather than500). This avoids format-related validation errors. - Keep files within the row limit -- The maximum is 2,000 rows per file. If you need to process more, split your data across multiple files and upload each one as a separate request.
- Download result files promptly -- Success and error files expire after 30 days. Download them as soon as processing is complete so you have the records available for your own reference.
- Review errors carefully before re-uploading -- When you re-upload corrected records, make sure to remove any rows that already succeeded. Processing a record that was already refunded may result in a duplicate refund error.